Monthly Archives: March 2014

Make a monogram shadowbox - AMerryMom.com

DIY decorating: Make a shadowbox monogram

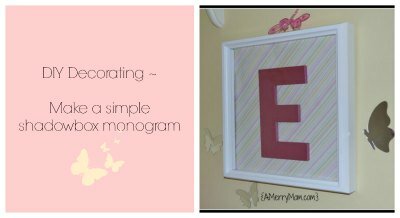
Do you love monograms as much as I do?

I love decorating with monograms for a personal, homey touch. I have several of our last name initials scattered around our house. There’s a big “S” here and a little one there.  I try not to go overboard, but I really love them!

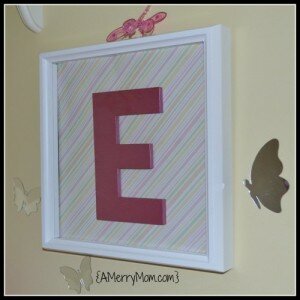
My daughter has picked up the same sense of style and loves to personalize things with an “E” for her first name.  So when we decided to add some decor to fill a corner in her room by her window, we knew she needed her initial on the wall.

We picked up all the supplies from Hobby Lobby – a white 12×12 shadowbox, a paperboard letter, a sheet of scrapbook paper, and some coordinating paint.  The materials were inexpensive, and it was an easy project that we could do together.

This was a great way for my daughter to be involved in decorating her own room.  She’s at that transition age when it’s time for some updates, and she wants to be hands-on with the decorating.  She got to pick the paint and paper (based on the options I gave her that would match her room), and then help put it all together.

First we painted the letter and let it dry.  She chose Anita’s Metallic Craft Paint in rose.  She did the first coat of paint, then I did the final coat to be sure the paint was even and wasn’t showing any brush strokes.Make a monogram shadowbox - AMerryMom.com

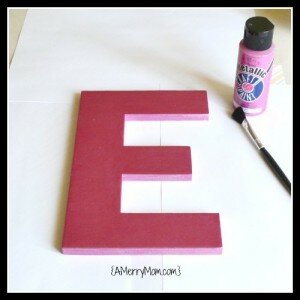
When it was dry, I used double-sided tape to attach the letter to the scrapbook paper, then placed it in the shadowbox.  Easy peasy!Make a monogram shadowbox - AMerryMom.com

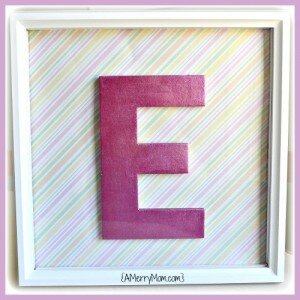
When we hung it up, my daughter decided to add a little pink dragonfly above the shadowbox.  We had some mirrored butterflies that were waiting for the perfect spot, so I let her stick a few around it on her wall.  We love how it personalizes her room!

Finished monogram shadowbox

This was a fun, simple mother-daughter project – perfect for a rainy Saturday afternoon!

Learning basic HTML for blogging – with free printable

It’s been six months since I first clicked the publish button on this little blog!

When I started blogging, I had no idea how much is involved to continuously write, design, publicize, and maintain a blog.  I’ve been on a steep learning curve over the last six months, and I continue to learn more each day.  I enjoy new challenges, so it’s been a fun and rewarding experience!

One of the things I’ve had to figure out along the way is how to use HTML coding.

Basic HTML printable

With WordPress.org as my blogging platform, I can do a lot without having to dive into HTML.  Thankfully, it’s easy to get started and publish simple posts.  But I’ve needed to go beyond the standard visual post editor on a few occasions, and that required learning some basic HTML.

Searching online, it’s been easy enough to find what I need to know.  I don’t use HTML often enough to memorize all the codes, though.  Along the way, I bookmarked sites and scribbled notes for myself.

Ultimately I decided that I needed a solid list of basic HTML codes for reference to speed up the process.  Since I like things that are handy and pretty, I put it together in a nice, colorful, printable list that I can keep in my blogging binder.

I’m happy to provide my list of basic HTML coding here as my first free printable!  I hope it’s helpful for other newbie bloggers like myself  who need a little cheat sheet for HTML.

Basic HTML printable PDF - AMerryMom.com

Download the printable Basic HTML code cheat sheet in PDF.

Are there other handy HTML codes I haven’t included on my basic HTML printable that you use regularly?

Note:  I also had to learn how to add this basic HTML printable to my blog.  Thanks to Becca at Amuse Your Bouche for her post with simple instructions!

I shared my basic HTML printable at some of these link parties.

Organized 31          Featured Button small

Celebrate spring with a Spring It On party!

Ahh, the first day of spring is here!  It’s been a long winter so it’s time to celebrate the change of seasons!

While my hubby and kids were away at work and school today, I set up our first annual Spring It On celebration.  I love to plan surprises for them, and I’m so happy to have time for it now that I’m a stay-at-home mom.

I started by making a quick spring banner for our living room fireplace.  I chose scrapbook paper in three festive designs and cut two circles from each pattern.  For the circles, I traced around my cute little spring candy bowl from the Target dollar spot.

Use a bowl for a circle banner pattern - AMerryMom.com

For the letters, I used my alphabet stencil cards from Hobby Lobby and sponge painted them with Folk Art acrylic paint in metallic peridot.  It seemed like the perfect spring green.  After I hung it from our fireplace mantle on a thin white ribbon, I was happy with the festive touch for the living room.Simple spring banner - AMerryMom.com
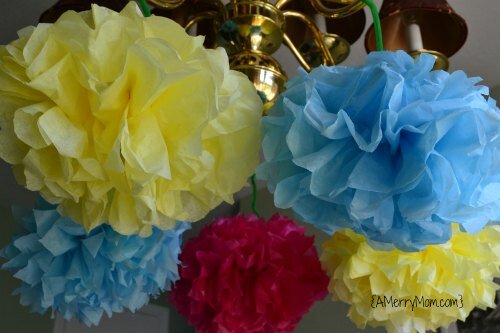
Next I gathered up the tissue paper pom pom flowers that I made for a birthday party last year.  They match my daughter’s room, so they’ve been hanging from her ceiling.  For today, the spring celebration demanded something fun – and fast – to dress up the dining room.Festive tissue paper pom pom flowers - AMerryMom.comFinally, I made flower cupcakes.  I was inspired by sunflower cupcakes a friend’s daughter made recently.  I’m not an expert decorator, so I wasn’t sure how they would turn out – but I figured if a 14-year-old girl could do it, I could at least try!

I made the cupcakes from a mix and then placed one side of an Oreo in the center of each cupcake when they cooled.  Oreo flower cupcakes - AMerryMom.com

While they were cooling, I whipped up a batch of my favorite buttercream frosting.  I loved the yellow sunflower cupcakes that inspired this dessert, but I didn’t have yellow food coloring on hand so I had to make my frosting flowers pink.  I pulled out my Wilton dessert decorator and attached the leaf tip to make the petals.

Although I’ve had this decorating tool for a long time, I’m still not super handy making the pretty decorating effects with it.  It’s trial and error each time I pull it out.  Plus I didn’t have time to chill the frosting in the refrigerator for long, and it was a little too runny.   My cupcakes were generally identifiable as flowers, but far from perfect!

Oreo pink flower cupcakes - AMerryMom.com

That’s OK.  The cupcakes were yummy anyway.   I’ll just have to try again when I have more time to dedicate for decorating them.

Everyone was happy with the impromptu spring celebration.  I’ve decided to make it an annual event to kick off my favorite season – spring!  Do you have family traditions to welcome spring?