With a little luck, restoring hardwood floors under carpet doesn’t require sanding and refinishing.
Have you ever wondered how hard it is to restore hardwood floors that have been hidden under carpet for years? Turns out it can be pretty easy!
When we moved into our 1960s-era house, I was glad to know that hardwood floors were hiding under the carpet. We didn’t know exactly what shape they were in, but I was hoping we would find lovely original hardwood floors waiting for us under the carpet.
Our boys were little when we bought the house, and our daughter was on the way. At the time, we had to just clean the carpeting thoroughly and leave it in place. We didn’t have the time or the budget to change the floors then.
Fast forward a few years, and the white carpet in my son’s room was showing some wear. In this case, I decided that was OK. Because getting rid of that carpet meant finding out what kind of hardwood floor was under there!
Planning to remove carpet over hardwood floors
While planning to uncover the original hardwood floor, I pulled back the corner of the carpet to find that the padding was stapled down, and not glued to the floor. I’m thankful we didn’t have to deal with removing adhesive!
However, I couldn’t tell much about the overall floor from the small corner I uncovered before starting the project.
Doing some research, I quickly learned that there were several scenarios that we could face under the carpet. We needed to plan for what we may find.
- Would they would be in decent shape? This is the best case scenario and would just require a good cleaning and a restoring polish.
- Would we have to sand and refinish the floors? This would require particular tools or hiring an expert. Also, once the process begins, it takes several days before the finish is dry enough to put furniture back into the room.
- Would we find they were too damaged to sand and refinish? This would require replacement wood floors or replacement carpet.
When we were finally ready to get started, we arranged for the kids to spend a few days with grandma & grandpa. We gathered the tools needed for removing carpet over hardwood floors (see our list below). Then we cleared the room and began ripping out carpet.
Uncovering the 1960s hardwood floor under carpet
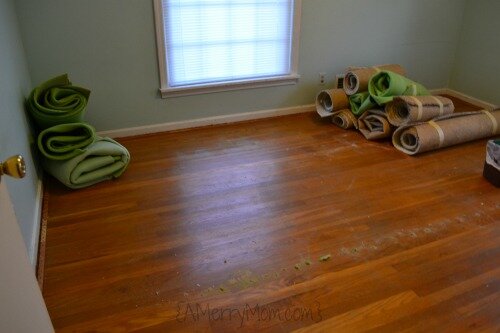
Pulling back the layers of carpet and padding, we found that the hardwood floor looked … OK.
It was dull and stained and littered with staples and tack strips, but it was usable. {Insert sigh of relief.}
We found that our hardwood floor is red oak, common for when the house was built in the 1960s.
The floor had a lot of staples holding the padding in place. Staples ran along the carpet tack strips at the edges of the room, as well as through the middle of the room where two pieces of padding connected.
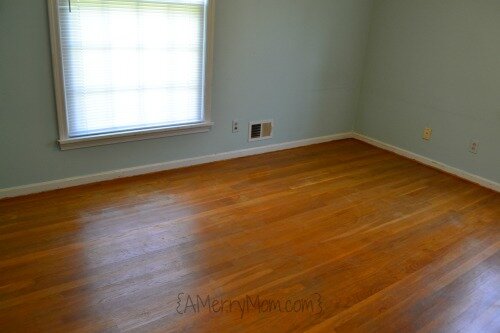
We spent some time pulling out all of the staples and tack strips and then sweeping up all the debris and dust. Then we evaluated the finish on the floor.
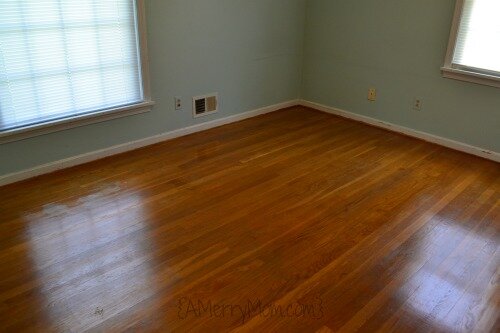
At first it seemed like sanding and refinishing would be required. The floor looked dull. The finish looked worn. And I would have liked a darker color on the floor.
The hardwood floor looked dull after the carpet, padding, staples & tack strips were removed.
But it wasn’t awful. So we debated whether to go through the expense and hassle to sand the floor and completely refinish it.
I consulted the Lowe’s website, which said:
If you’re not sure if your hardwood floor needs refinishing, put a few drops of water on it. If the water beads or soaks in slowly over a few minutes, you probably just need a good cleaning and polishing. However, if the water soaks in immediately, it’s time for a refinish.
I tried this test, and the water did not soak into the floor. So before spending the time and money to sand and refinish the floor, we decided to try a faster and easier approach.
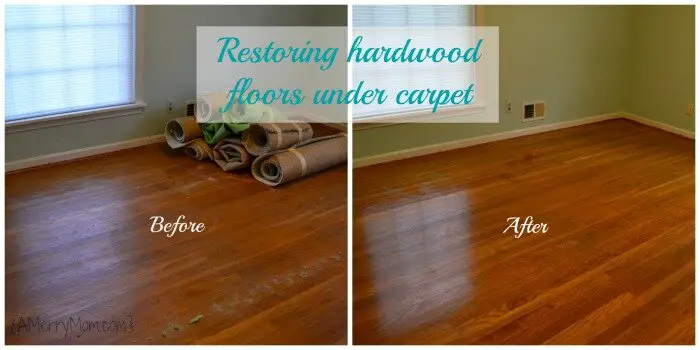
This process restored our dull, original 1960s floors to their former glory!
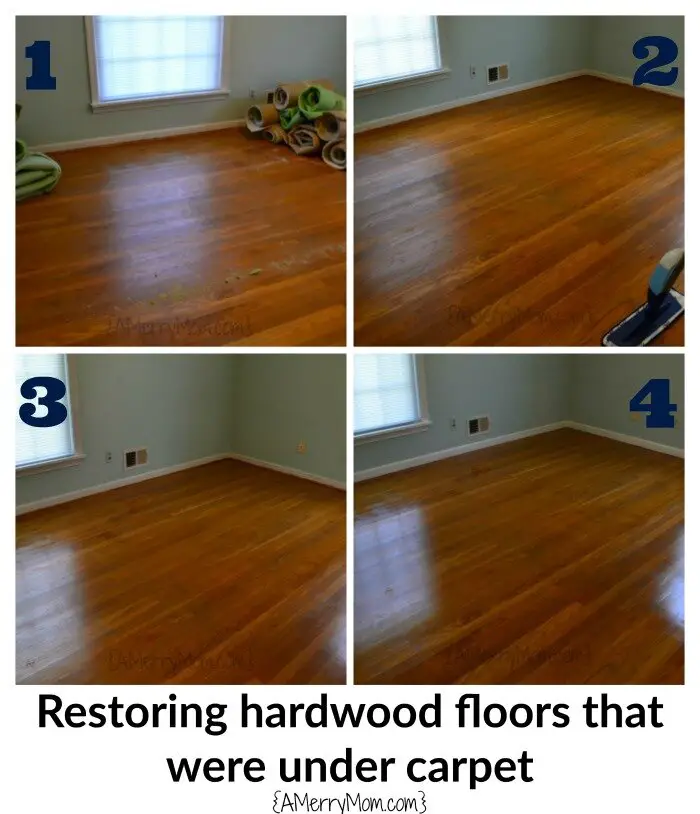
Restoring hardwood floors under carpet – in 4 easy steps
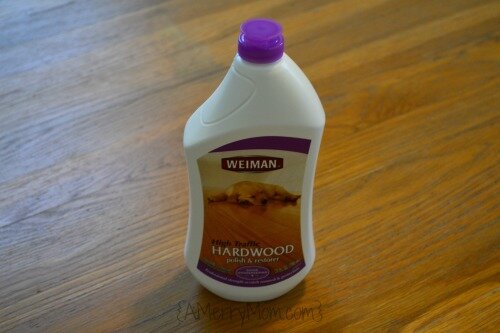
My cousin had recommended trying the Rejuvenate floor restorer product. It sounded like it may work for my floor. I looked for it at a local store and didn’t find it. Instead I found Weiman High Traffic Hardwood Floor Polish & Restorer. It sounded like the same type of product – and it was a little less expensive (love that bonus!) – so I decided to give it a try.
While I was at the store, I also bought the Bona hardwood floor cleaning system. Back at home, I was ready to get to work restoring hardwood floors from being under carpet for so long.
With four easy steps, my floors were beautiful and shiny! And I had no sanding or refinishing!
1. Remove carpet, padding, and all debris from the floor.
Make sure nails, staples, and other debris are all off the floor. Vacuum well and ensure that no dust, wood splinters, and other remnants are left on the floor.
2. Thoroughly wash the hardwood floor.
I used the Bona hardwood floor cleaner system. Some people like to use a vinegar and water wash to clean hardwood floors. Just get the dirt up before the next step to polish the floor.
The floor looked better after cleaning. I used the Bona hardwood floor cleaning system.
After a good cleaning, my floor looked better, but still dull.
3. Apply Weiman High Traffic Hardwood Floor Polish & Restorer.
After the floor was clean and had plenty of time to dry completely, I applied the Weiman High Traffic Hardwood Floor Polish & Restorer.
This close-up photo shows how dull the floor was before using this product.
The directions said to apply the product in a zig zag motion and spread it evenly with a clean mop. I used a brand new sponge mop.
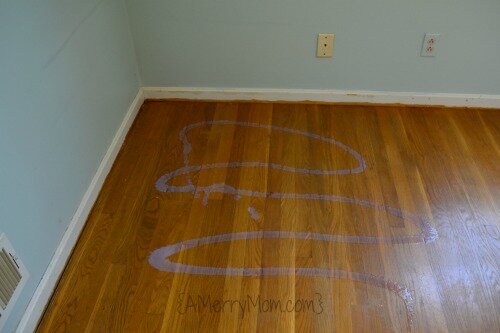
Apply Weiman High Traffic Hardwood Polish & Restorer to dull wood.
Voila!
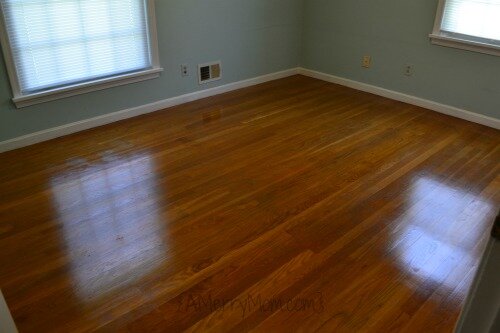
The Weiman polish and restorer product made the hardwood floor look so shiny and pretty after just one coat!
After one coat of Weiman High Traffic Hardwood Polish & Restorer.
4. Apply a final coat of Weiman High Traffic Hardwood Floor Polish & Restorer.
The bottle said you could apply up to three coats within a 24 hour period. I waited the requisite 45-60 minutes and applied another coat.
The floor looked shiny after two coats of Weiman High Traffic Hardwood Polish & Restorer.
You could stop with two coats of the product. I wanted the floors as shiny as possible so I waited again and applied a third coat of the product.
I didn’t see a huge difference in the floor after the second coat and the third coat, but you can judge for yourself from the pictures.
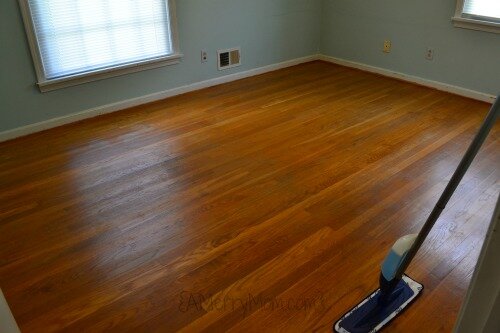
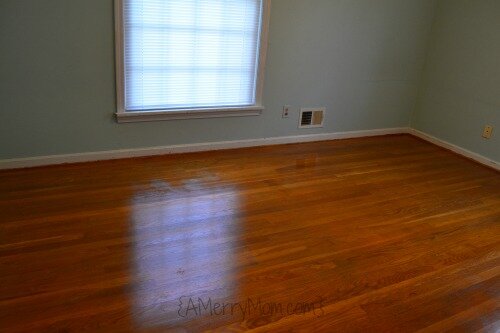
Here’s the final reveal after three coats of the polish and restorer product.
The floor glowed with a lovely shine after three coats of Weiman High Traffic Hardwood Polish & Restorer.
The shine on the floor is beautiful! The floor is not sticky or more slick. It just looks pretty!
The Weiman product made restoring hardwood floors under carpet a much easier process than I had feared it would be. According to the bottle, it “is specifically formulated to instantly rejuvenate hardwood floors. Micro-filling technology removes scratches, while a protective, scratch resistent layer prevents new scratches from forming.”
An important note about the Weiman polish and restorer product is that it is safe for all hardwood floor finishes. Our hardwood floor did not appear to have a polyurethane finish. (We still need to figure out exactly what was used to finish our floors in the 1960s – varnish or wax.)
Now that we’ve completed one room, we’re looking forward to freeing our other original hardwood floors from the carpeting in our house!
Have you tried restoring hardwood floors under carpet? Or are you planning a project of your own?
Tools for restoring hardwood floors under carpet
- Utility knife – for cutting up carpet and/or padding into more manageable size strips for rolling up and removing from the room.
- Prybar – for pulling up the carpet tack strips. I liked the DascoPro prybar set (Amazon affiliate link) since the bars were the perfect compact size for getting under the tack strips.
- Hammer – for pulling nails from the floor.
- Pliers – for pulling staples holding carpet pad.
- Masking tape or duct tape – helps for securing rolls of carpet & padding for removal.
- Safety glasses – protect your eyes when pulling staples and nails from the floor.
- Knee pads – help when kneeling to work on the floor.
- Broom / vacuum.
- Hardwood floor cleaner. I used the Bona hardwood floor spray mop and cleaner system (Amazon affiliate link).
- Weiman High Traffic Hardwood Polish & Restorer (Amazon affiliate link).
- Sponge mop.
RECOMMENDED POST: Protecting Floors When Living With Pets
This post contains affiliate links, which help support this site. For more information
on affiliate links, please refer to my disclosure statement.
I shared this project for restoring hardwood floors under carpet at some of these link parties.