Tag Archives: DIY

Decorating the porch with an easy DIY Christmas tree

I love decorating for Christmas and making everything look festive!

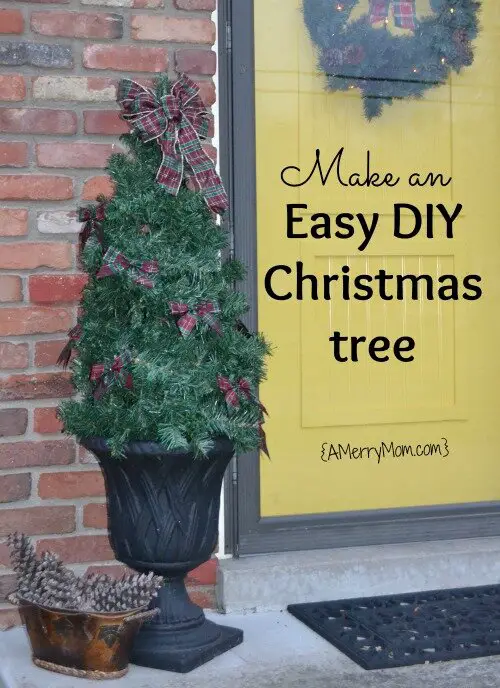
This year I decided we needed some new decorations for the front porch.  I saw some DIY Christmas trees on Pinterest that used tomato cages, and they looked so nice!  After I got some new and improved tomato cages this summer, I decided to upcycle the old, rickety ones into lovely Christmas trees for the front porch.

Make an easy DIY Christmas tree for the porch using a tomato cage - AMerryMom.com

The old tomato cages were all bent up and misshapen after a few years of use.  That’s OK for this project since they’re the unseen support system for the trees.  I just had to reshape them a little to get the correct Christmas tree form.Christmas tree tomato cages

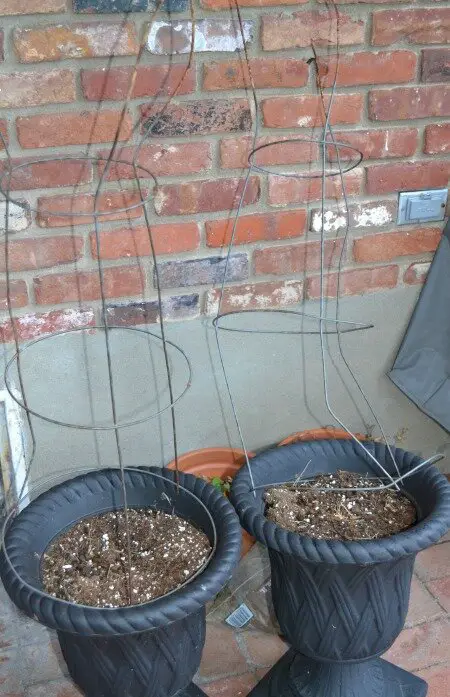
When the annual flowers in my front planters faded, it was time to put the planters to new use as a Christmas tree base.  I bent the top circle of the tomato cage to fit in the planter, pressed it into the dirt, and added a brick to weigh it down.Christmas tree brick
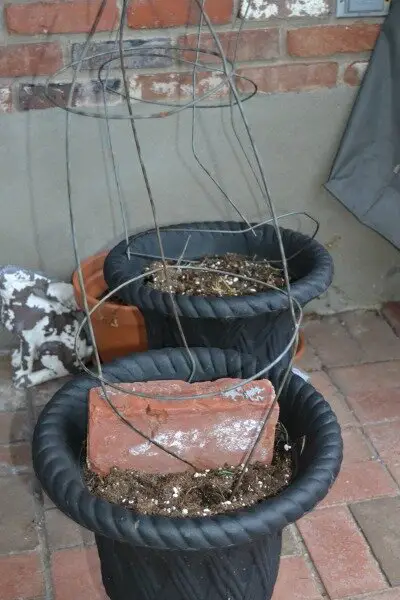
I gathered the three base wires on the tomato cage into a pyramid shape at the top.  Then it was simple to wrap the garland around the tomato cage into a conical Christmas tree.Christmas tree undecorated
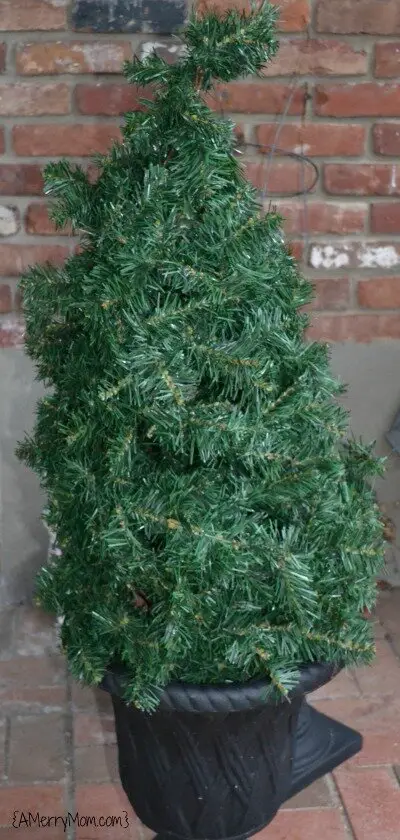
When I was done wrapping the garland, the shape needed a few adjustments for a more natural look.  I fluffed out a few spots on the wire frame and pulled out some of the garland branches.  We added some bows and put it in place on the front porch.

I wish I could add some lights, but we don’t have a plug handy.  That’s OK.  Even without lights, it’s a nice, festive touch by the front door.Easy DIY outdoor Christmas tree from a tomato cage - AMerryMom.com

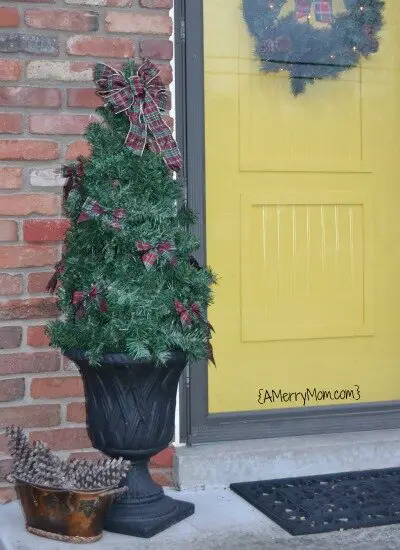
This DIY Christmas tree was wonderfully simple to make for the front porch using the tomato cages.  I had all the materials on hand except the garland, but it’s an inexpensive DIY project even if you have to buy all the items.

DIY Christmas tree materials

  • Garland – For one tree, I used two 9-foot garlands that I purchased from Hobby Lobby for $10 total.  (They were $5 each on sale – 50% off the regular price of $9.99 each.)
  • Tomato cage – Available at garden centers for about $2.50
  • Flower pot for base – Various styles and price points available at garden centers.  Mine was about $20 from Lowe’s a few years ago, but you can get simple planters for less.
  • Weight for base – I used a brick to weigh down the base of the tree so it wouldn’t topple over in the wind.
  • Outdoor decorations for the tree

Merry Christmas!

Wishing you a wonderful Christmas season!  I’m taking time off from posting on this blog for the rest of December to enjoy the holidays with my family.  See you next year!

This project is linked up at some of these link parties.

Simple DIY autumn sign: Happy fall y’all!

Happy fall y’all!

Isn’t it fun decorating for the seasons?  Now that it’s officially fall, I’ve been pulling out my autumn decor.  While I was shopping at Kirkland’s recently, I saw some cute fall plaques.  They were reasonably priced, but I decided it would be a fun project to make my own DIY autumn sign.Happy fall y'all - DIY autumn sign - AMerryMom.com

For this simple DIY autumn sign, I used a 1-inch by 3-inch by 4-foot piece of select pine from Lowe’s.  It was just $3.82, and I used only 18 inches of the wood, so I have more than half left for another project.  The soft pine wood was the perfect base for this sign because I could trace the outline of the letters onto the wood.

I used Microsoft Word to select the font for my sign.  I used High Tower Text, bolded and italicized, in 150-point font size.  After I printed out the words on my printer, I positioned the sentiment on the board and traced around the letters with a pen to mark through onto the wood.  I later found that the paint obscured the letters I had traced, so I realized the lettering should be saved until after painting the wood.Happy fall y'all - DIY autumn sign - AMerryMom.com

After all the words were traced onto the board, I cut the end off at the right size.  I left a two-inch margin on the board before and after the words.  The board I purchased was very smooth.  The ends just needed a light sanding before painting.

I rummaged through my craft paints for the right shade.  I picked Deco Art Americana Napa Red acrylic paint (affiliate link).  It’s a nice, rich, autumn red.

Since the paint obscured the letters I had already traced onto the wood, I went through that step again to mark my letters.  I went around a couple of times on each letter with a heavy hand to make sure the outline was visible on the painted wood.

Happy fall y'all - DIY autumn sign - AMerryMom.com

The letters traced easily onto the pine wood, but I had to do this step again after painting, since the paint obscured these markings on the wood.

I used a Martha Stewart gold metallic marker for the words.  I actually have had this marker for a while, so I was happy to find that it still worked.  From what I can tell, those markers are now discontinued, but Amazon has Pilot metallic markers (affiliate link) that should work just as well on wood over paint.

My metallic marker did a good job allowing me to carefully trace and fill in the letters on my sign.  It covered very well over the dark red paint.

I love the metallic accent of the gold on the red sign.  And since I’m a southern girl, I also love the cheery sentiment!Happy fall y'all - DIY autumn sign - AMerryMom.com

This simple DIY autumn sign is a fun addition to my fireplace mantle, with the harvest banner I made last year!

Wishing you a fantastic fall!

This project is linked at some of these link parties.

This post contains affiliate links, which help support this site.
Please refer to my disclosure statement for more information.

Patriotic red, white, and blue tie dye shirts for Independence Day

With Independence Day coming up soon, I’m on a red, white, and blue crafting kick.  Today’s project was tie dye shirts.  Tie dye designs often remind me of fireworks, so it’s the perfect project to help us celebrate the 4th of July.

Patriotic tie dye shirts - amerrymom.com
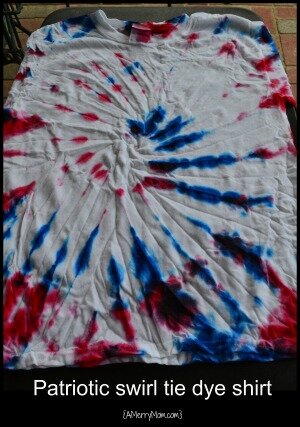
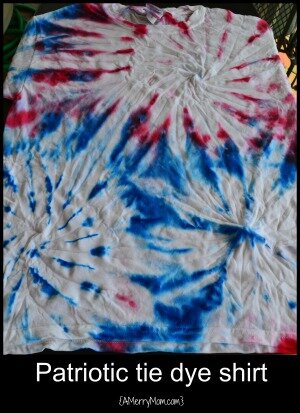
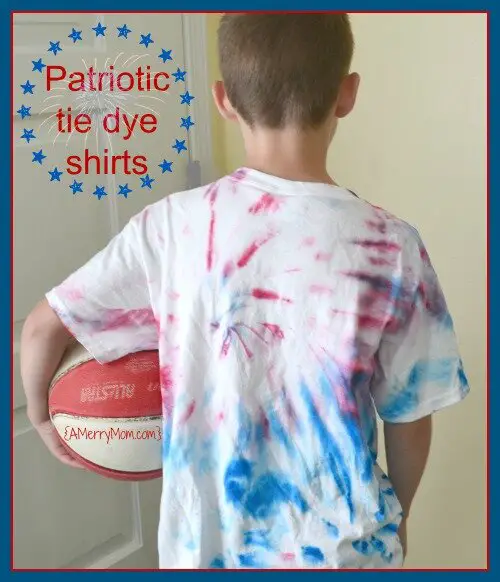
I recently realized that through all of the kids’ activities my children have attended, they’ve never done any tie dye projects.  How did that happen!?  Since I loved tie dying when I was a kid, I decided that for today’s Try It Tuesday, it was time for my kids to learn how to tie dye shirts.

I bought the three white shirts and two colors of spray-on fabric dye from Hobby Lobby for just $14.10.  With their everyday 30% off pricing for t-shirts, I got each shirt for just $2.44, and I chose two-ounce bottles of red and blue SEI Tumble Dye for $2.99 each.  We finished three kid-size tie dye shirts with plenty of dye left over for other projects.

Tie dye shirt - before - amerrymom.com

We dampened each shirt with water and put them flat on a table to get started on the designs.

We created two designs for these patriotic tie dye shirts.

Swirl Tie Dye Shirt

My oldest son wanted a swirl pattern on his shirt, so we pinched it in the middle and twisted the whole shirt into a large, flat swirl.  Then we added rubber bands to resemble pie slices.  Tie dye shirt - prepared for swirl pattern - amerrymom.com
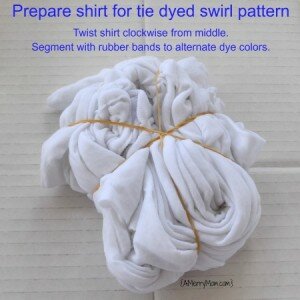
We took the shirt outside and placed it on cardboard to catch excess dye as my son sprayed the colors onto the shirt.

He sprayed the dye onto each segment, alternating colors.  The red bottle was harder to spray and was leaking dye onto his hand.  (We should have worn gloves – but the color washed off our hands well.)  He liked using the blue better and got some extra blue in a red segment, but that’s OK.  Since tie dying shirts is not a perfect process, a mistake in the pattern is fine.Tie dye shirt swirl pattern in progressWe let the dye air dry outside for a while, keeping the bundled shirt flat and in the shade.  When we unwrapped the shirt, my son was very happy with his design!  It just needed a tumble in the dryer for 20 minutes to heat set the color, in accordance with the dye instructions.Patriotic swirl tie dye shirt - amerrymom.com

This shirt has a great look for Independence Day!

Firework Tie Dye Shirt

We also created a fireworks-patterned shirt.  This is my favorite design for our patriotic tie dye shirts.

We made two small swirl patterns in opposite areas of the shirt by pinching in the middle of the area and swirling it in a flat circle.  We applied rubber bands to hold it in place.  Then we used small bullesye patterns for the remaining two corners by pulling those areas of the shirt straight up and wrapping rubber bands around them in two layers.Tie dye shirt fireworks pattern - in progress - amerrymom.comMy son applied the spray-on fabric dye in alternating red and blue.  With the red bottle leaking dye onto his hand, he used more blue for his design.

Tie dye shirts - applying fireworks pattern - amerrymom.com

Again, we let the dye air dry outside for a while, with the shirt flat and out of the sun.  After we removed the rubber bands, the shirt needed to go into the dryer for 20 minutes to heat set the color, in accordance with the dye instructions.

Patriotic tie dye shirt fireworks pattern - amerrymom.com

When we unwrapped the shirt, it had a great fireworks pattern that is perfect for the 4th of July!

The kids all enjoyed creating their own tie dye shirts.  It’s a great summer activity and a fun way to display patriotic red, white, and blue!

Looking for more summer fun?  Check out this great list of over 30 free or inexpensive summer activities for kids!

If you like these patriotic tie dye shirts, see more red, white, and blue on my summer Pinterest board.  Come on over and pin along with me!

Follow Lisa {A Merry Mom}’s board Celebrate – Summer on Pinterest.